

Looks like you don't have ESC button on your device
Download IronCAD DCS
Choose one of the following options
trial versionHas a license
Looks like you don't have ESC button on your device
Choose one of the following options
trial versionHas a licenseScroll down to start reading the guide
***IMPORTANT INFORMATION***
If you are using IRONCAD or an earlier version and plan to upgrade to IRONCAD or later, you will need to install a new version of Sentinel (10.2) from the link above. You will need to uninstall the previous version of Sentinel before installing the new one. Also, make sure that the server has been recently updated with the latest Windows updates.
***
Once installation is complete, you may need to manually start Sentinel RMS License Managerservices under "Services" on the server.

In order to receive your license file, you need to send a couple of unique codes linked to your hardware to IronCAD.
NOTE: Please bear with us for any delays. The license file is generated manually by IronCAD and sent back to the same email address. This usually happens in the afternoon/evening, as there is a 6-hour time difference between our time zones.
Go to Start> All Programs> IronCAD> Hardware ID Tool

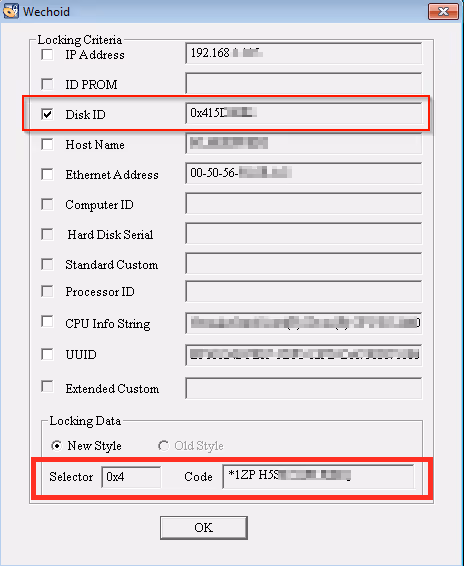
We will now select a unique code based on the hard drive (Disc ID):
If you get an error message after the installation process is complete, it may be because you have a space in your Windows username. Try unpacking the installation file manually by following the steps below. We have written how to do this in both Windows 11 and Windows 10.
This is for Windows 11
If the path to the folder that handles "My Documents" and "Downloaded Files" etc. contains a space in your username (\Firstname_space_Password\) you need to manually unpack the installation file, otherwise an error message will appear during installation. To unzip, you can for example use WinRAR/WinZIP or preferably the easy to use and compact 7-zip: https://www.7-zip.org/
Then you can right-click on the file you downloaded and choose Show more options

Then select 7-zip followed by Unzip to "IronCAD_DCS2023SP1_SWE\

Then run the installation file itself in the new folder by right-clicking on the *.exe file and selecting Run as administrator:

This applies to Windows 10
If the path to the folder that handles "My Documents" and "Retrieved Files" etc. contains a space in your username (\Firstname_Space_Password\) you need to manually unzip the installation file, otherwise an error message will appear during installation. To unzip, you can use WinRAR/WinZIP or the easy to use and compact 7-zip: https://www.7-zip.org/
Then you can right-click on the file you downloaded and choose to unzip it into a new folder which will be created automatically.

Then run the installation file itself in the new folder by right-clicking on the *.exe file and selecting Run as administrator:

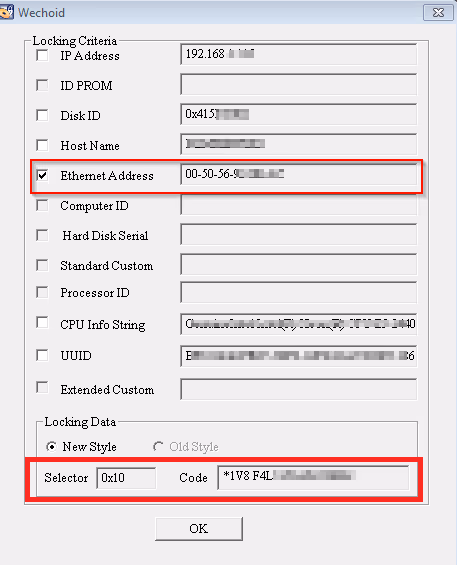
Now repeat the process to get the Ethernet Addresscodes.
These codes (both Disk ID and Ethernet Address) should now be emailed to ironcad. Please CC supportsolidmakarna.se so that we are aware of the matter and can more easily assist with any questions. Please also include the serial number for the license, which can be found on your license certificate. It begins with NLUS20XX–……, where the numbers at the end are unique to each license and company.
Proposed email to IronCAD :
Hi,
Can you please send me the license file for this Sentinel RMS Server?
Serial Number: 20XX-xxxxxx
Disk ID: 0x4 xxxxxxxxxxxx
Ethernet Address: 0x10 xxxxxxxxxxxx
As mentioned, please bear with us for any delays. The license file for your server is generated manually by IronCAD and sent back to the same email address. This usually takes place in the afternoon/evening, as there is a 6-hour time difference between our time zones.
Once you have received your license file, it will be imported to the license server as follows.
Go to Start > IronCAD> License Manager Admin
Expand Subnet Servers and right-click on the server name where the license should be placed.
Select the option Add Feature > From a File > To Server and its File.

Locate the license file, then click Open to continue
The dialog box confirms that your license has been approved and is now ready to use.
Click OK to continue.

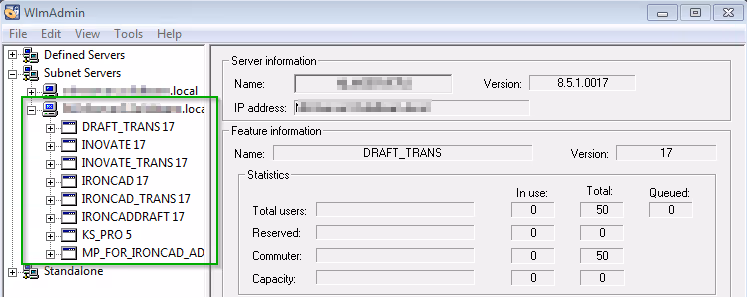
Now click on the plus sign to the left of the server name and a list of the programs you have licenses for will expand. Then click on the program name to see how many licenses you have associated with each program.
The activation is now complete. Check that the license is working properly by starting IRONCAD on one of the clients.