Looks like you don't have ESC button on your device
Download IronCAD DCS
Choose one of the following options
trial versionHas a license
Looks like you don't have ESC button on your device
Choose one of the following options
trial versionHas a license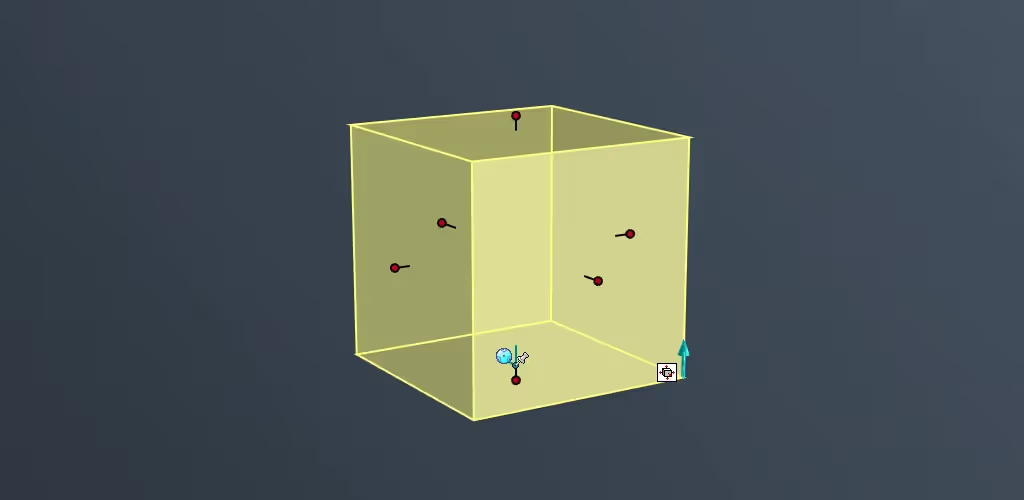

Emil Rindell

Jonas Bryntesson

Henrik Andersson
2021-01-06
Emil Rindell
Jonas Bryntesson
Henrik Andersson
2021-01-06
The round Sizebox handles in IRONCAD give you as a user direct and precise control over dimensional changes of Shape features such as extrusions.
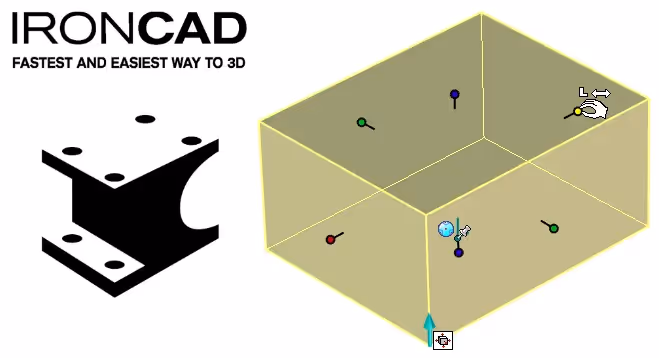
The vast majority of IRONCAD users know that you can easily drag a Sizebox handle(or several at the same time) to change the dimensions of a given shape to exact measurements, and virtually all IRONCAD users know that there are also right-click options on the handles, which allow you to bring up different options for snapping to other more or less easily accessible geometric points on different objects in the 3D scene.
But fewer people know that there is actually another set of handles on the same feature, which allow you to "draw directly" on the lines of the cross-section (Sketch). These are called Shape handles and instead have an angular shape and red color.
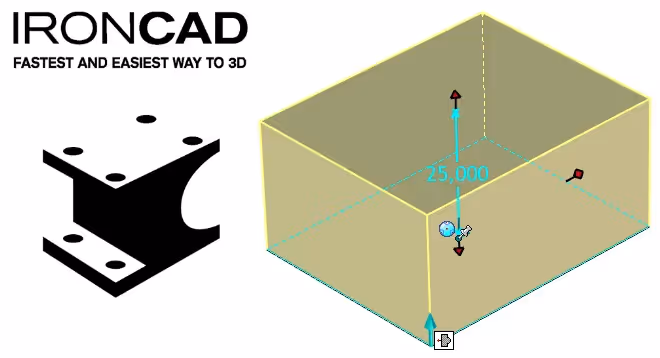
Switching between the round Sizebox handles and the angular Shape handles is easy and simple, either by clicking on the white switch icon located by the cyan extrusion arrow or by using the keyboard shortcut [TAB] when a shape is selected.
The Shape handle technology is super smart (and technically advanced under the hood) but at the same time very easy to use to directly draw and change various lines "inside" a sketch, without having to go in and edit it via Edit Cross-section. You work with the sketch's lines "outside" the sketch itself in a way that is completely unique to 3D CAD.
Using Shape handles can work well even if you have a "locked" sketch (via constraints), as the handles do not break the locks. However, keep in mind that the effect of your change is limited when using constraints. A "fully defined" sketch cannot be changed via handles, but only via the constraints that control the length and position of all lines in the sketch. This means that with a fully defined sketch you actually "lose" a certain amount of control and flexibility, which is why we rarely recommend the use of constraints in the sketch!
You can associate a Shape handle with an edge, which means that the line in the sketch will always be at the height of the selected edge. This function is somewhat similar to using a Mate constraint, with the exception that the geometry does not stop working if you choose to break the association. Constraints are never a requirement in IRONCAD and therefore you will not have problems with lost associations.
The Shape handles also allow users to select a reference point, which is offset from the handle, and then use the [Shift] Snap command to snap to a known point.
The Shape handles also have the ability to change the orientation so that you can pull the profiles in exactly the direction required. This is incredibly powerful and provides a kind of "dynamic control" in a wide variety of situations.
Another smart feature is that you can select multiple IntelliShapes at the same time by changing multiple Sizebox handles at the same time. For example, you can have multiple holes in a part and synchronize diameters or heights by first [Shift]-selecting the IntelliShapes and then editing the dimensions via the Property Browser.
In addition to resizing multiple features at once, you can also move some features while resizing others - at the same time! If you select all features (hold down the [Shift] key) and drag a round Sizebox handle, the the size of all.
However, if you switch between the Shape/Sizebox handle on certain individual features in your selection, the features set on the Shape handle will instead be moved when a Sizebox handle is dragged to adjust the size.
Here is another example where several features change shape and position at the same time by combining these two types of handles depending on what you need to do at a given moment (without having planned for it beforehand).
You can choose to set an "active" Sizebox handle, so that every time you enter the Sizebox mode on your feature , you will come to that particular Sizebox handle first. If you always make a size change from the same handle (e.g. the diameter of a cylinder), it might be a good idea to set that particular handle as "active".
Answer: Here we publish tips, guides, news and solutions for those who work with IRONCAD and Design Data Manager (DDM). The blog covers everything from basic functions to advanced workflows, helping you to optimize your design work. You'll find examples of smart shortcuts, practical instructions, solutions to common problems, and best practices for product design, mechanical design, and product data management.
Answer: Our guides and tips are designed for both beginners and experienced CAD users. They are aimed at designers, engineers and project managers who want to work more efficiently with IRONCAD and DDM, improve the design process, reduce mistakes and save time in product development.
Answer: We regularly publish new articles when the software is updated, when new features are introduced, or when our users ask for solutions to specific problems. The blog is therefore a reliable source for keeping up to date and getting tips that make everyday CAD work easier.
Answer: Many of our instructions and tips work in multiple versions, but we clearly indicate if an article applies to a specific version. We strive to make the content useful for older versions as well, and also provide recommendations on how to adapt workflows to the version you are using.
Answer: Absolutely! If you can't find the solution in the blog, you can contact our technical support via solidmakarna.support. Our experts will help you with everything from installation and configuration to advanced features in IRONCAD and DDM, so you can solve problems quickly and efficiently.
Answer: Yes! We appreciate suggestions from our users. If you have questions, tips or want us to address a specific issue in IRONCAD or DDM , please contact us via our contact form and we will prioritize relevant topics in future posts.
Answer: The blog contains, among other things:
Practical step-by-step guides to help you use IRONCAD and DDM more effectively.
Productivity and workflow tips for faster design and construction.
Solutions to common problems encountered by users in CAD programs.
Updates and news on new features, versions and improvements.
Best practices for data management and project organization in DDM.
Answer: All tips and guides are directly applicable in daily work. For example, you can use shortcuts and smart features in IRONCAD to speed up modeling, structure files better in Design Data Manager, or follow our step-by-step solutions for specific problems that often come up in design projects.
Answer: We strive to ensure that all guides and tips are relevant to the latest versions of IRONCAD and DDM. We also clearly mark when a post applies to an older version, so you always know if the instruction is directly applicable to your system.
Answer: Yes! Many of our users share the articles with colleagues and use them as internal training materials. The blog is a great complement to formal training and helps teams learn features faster, avoid mistakes, and standardize workflows in IRONCAD and DDM.